
Tools
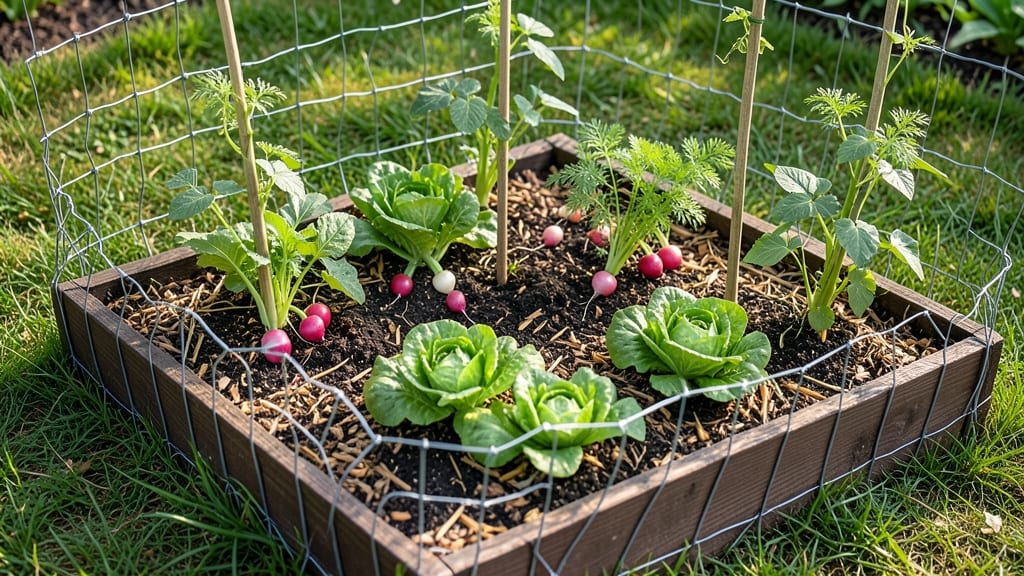
A chicken wire vegetable garden frame is your secret weapon against pests—keeping rabbits, deer, and even curious squirrels out without breaking the bank.
Picture this: you’ve just planted your 🥕 spring crops, only to wake up the next morning and find half of them nibbled away. Frustrating, right? A simple chicken wire setup can turn that disappointment into a budget-friendly fortress for your garden.
Beyond pest control, chicken wire adds versatility—whether you’re building a raised bed, a trellis for climbing beans, or even a hoop house for extra protection. It’s durable, easy to install, and works in USDA Zone 6 (and beyond) for spring planting.
In this guide, I’ll walk you through three proven designs, common mistakes to avoid, and how to maximize your setup for a thriving garden—no fancy tools required.
How to build a chicken wire vegetable garden frame for pest control
A chicken wire vegetable garden frame is one of the most budget-friendly ways to protect your crops from rabbits, deer, and insects without breaking the bank. Unlike expensive fencing, chicken wire is flexible, easy to install, and can be customized for raised beds, hoop houses, or trellises.
The key is using 19-gauge or 22-gauge wire (the thicker, the better for durability) and securing it properly to deter even the most determined pests.
Before you start, gather your materials: chicken wire rolls ($10–$20 each), stakes or rebar ($5–$10 per 10-pack), zip ties or wire twist ties ($5 for a pack), and gloves (to avoid prickly wire).
For a 4x8-foot frame, you’ll need about two 10-foot rolls of wire and 12 stakes. The best part? You can reuse this setup year after year with minimal maintenance.
Now, let’s dive into three practical designs—each with its own strengths. Whether you’re protecting leafy greens from slugs or tomatoes from deer, these frames will give you peace of mind and bigger harvests.
Start with the design that fits your garden’s needs, and remember: bigger gaps mean bigger pests—aim for 1-inch squares or smaller for maximum protection.
Step-by-Step Guide to Building Your Chicken Wire Frame
- Step 1
- Step 2
- Step 3
- Step 4
- Step 5
- Step 6
For raised beds, this frame works like a mini fortress against slugs, cutworms, and even groundhogs.
Line the bottom with cardboard to block weeds, then fill with compost and soil. Leafy greens like lettuce and spinach thrive here because the wire keeps crawling pests out while allowing sunlight and rain in.
If you’re dealing with deer or large rabbits, opt for the hoop house design. Bend PVC pipes into arches, cover them with wire, and top with plastic sheeting for a low-cost greenhouse.
This setup protects tomatoes, peppers, and herbs while extending your growing season. Just remember to secure the ends with rocks or sandbags to prevent wind damage.
For climbing plants like cucumbers, pole beans, or peas, a chicken wire trellis is a game-changer. Weave the wire between two vertical posts (like T-posts or wooden stakes) to create a lattice.
This not only keeps pests out but also saves space and improves air circulation, reducing diseases like powdery mildew. Plus, harvesting becomes a breeze!
One of my favorite pro tips? Paint the wire with non-toxic spray paint (like white or green) to blend it into your garden and reduce visibility to pests.
It’s a small touch that makes your setup look neater and more professional. Just avoid dark colors, as they can overheat the wire in full sun.
Finally, don’t forget to rotate your crops each year to prevent soil depletion and pest buildup. Chicken wire frames are versatile, so you can reconfigure them for different vegetables as the seasons change.
With a little creativity, you’ll have a pest-proof paradise that yields bountiful harvests with minimal effort.
Ready to get started? Grab your wire, stakes, and gloves—your vegetable garden’s new shield is just a few steps away! 🌱
3 Chicken wire garden frame designs compared: pros, cons, and best uses
Choosing the right chicken wire garden frame depends on your vegetable types and pest challenges. Whether you need a raised bed for root crops or a hoop house for season extension, each design offers unique benefits.
Let’s compare three popular setups to help you decide which fits your garden goals.
I’ve tested all three in my own vegetable garden, and while they all deter pests like rabbits and deer, their durability, cost, and plant compatibility vary. Below, I break down the pros, cons, and ideal uses for each, plus a cost comparison to help you budget.
The raised bed frame is my top pick for root vegetables like carrots and potatoes. It’s sturdy, keeps pests out, and improves soil drainage. However, it requires more materials (like wooden stakes) and costs slightly more than the other options.
A hoop house is ideal if you want to extend your growing season. I’ve used one to grow tomatoes in early spring and late fall, but it needs reinforcement (like PVC pipes) to handle wind.
The trade-off? It’s flexible and easy to assemble, but the wire can sag over time.
For climbing plants, a trellis system is a game-changer. Cucumbers and peas thrive vertically, saving space and improving airflow. The downside? Chicken wire alone isn’t strong enough for heavy vines—you’ll need to add wooden supports or bamboo stakes for durability.
Budget-wise, the trellis system wins for affordability, while the raised bed offers the best long-term value. If you’re growing a mix of crops, consider combining designs—a raised bed for roots and a trellis for vines in the same space!
No matter which you choose, bury the chicken wire edges 6 inches deep to block burrowing pests. For extra protection, line the inside with landscape fabric to keep out insects while allowing water and air through.