
Tools
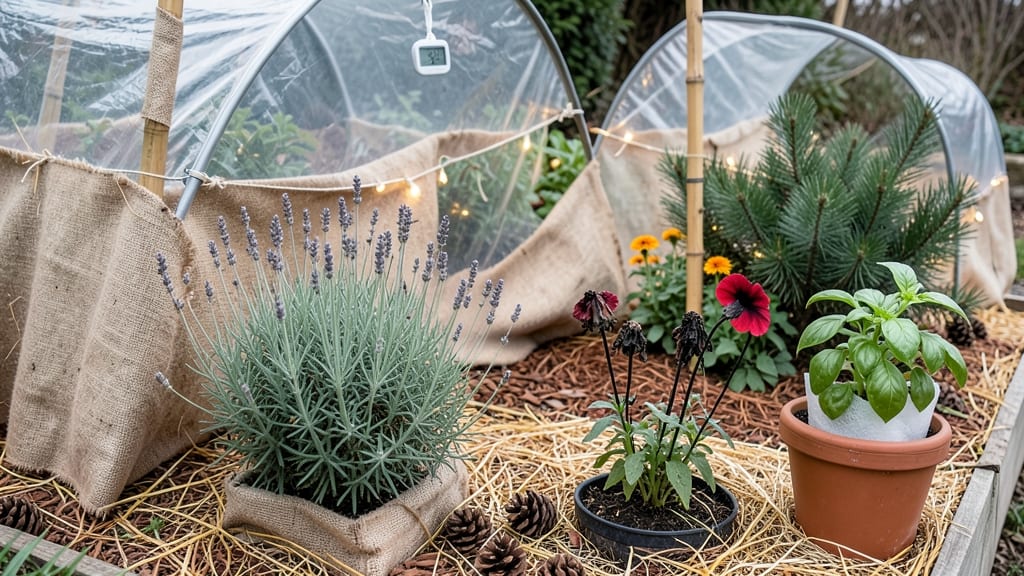
Winter protection for garden is the key to keeping plants alive and thriving ❄️—and the right strategies make all the difference between a dead landscape and a spring rebirth.
Frost can turn your thriving garden into a winter wasteland—but the right protection can save your plants from damage and ensure a stronger spring comeback. Without it, even cold-hardy perennials struggle, and tender annuals won’t survive the freeze-thaw cycles that crack roots and stems.
From frost blankets to mulch layers, there are simple, cost-effective ways to shield your garden without sacrificing airflow or trapping moisture. Whether you’re in Zone 6a or further north, the goal is the same: insulate without suffocating so your plants wake up ready to grow in spring.
Here’s how to choose the best coverings, install them properly, and avoid the costly mistakes that leave plants more vulnerable than ever. Let’s get your garden through winter the right way.
Best frost-resistant garden coverings for extreme cold protection
When winter temperatures drop below 28°F, even hardy plants can suffer frost damage. The key to saving your garden lies in choosing the right frost-resistant coverings—each material offers unique benefits depending on your USDA hardiness zone and plant types.
Whether you're protecting tender perennials, annual vegetables, or delicate shrubs, the wrong covering can trap moisture or suffocate roots. Let’s break down the best options to keep your garden thriving through extreme cold.
Not all coverings are created equal. Some materials, like frost blankets, provide lightweight protection for short freezes, while others, such as straw mulch, offer long-term insulation against deep freezes.
Your choice depends on factors like temperature extremes, plant height, and whether you need temporary or seasonal protection. Below, we compare the top frost-resistant materials to help you make an informed decision for your garden’s specific needs.
⚠️ PRO TIP: Always secure coverings with brick weights or clips to prevent wind damage, and avoid plastic directly on leaves to prevent rot.
| Material | Temperature Protection | Best For | Pros | Cons | Cost (Per Unit) |
|---|---|---|---|---|---|
| Frost Blanket (Frost Cloth) | 20°F to 28°F (-6°C to -2°C) | Annuals, seedlings, herbs | Lightweight, breathable, reusable | Limited protection for extreme cold | $15–$30 |
| Row Covers (Floating Fabric) | 15°F to 25°F (-9°C to -4°C) | Vegetables, berries, perennials | Allows sunlight, extends growing season | Can trap heat if not ventilated | $20–$50 |
| Bubble Wrap | 10°F to 20°F (-12°C to -6°C) | Potted plants, small shrubs | Insulates roots, DIY-friendly | Not breathable, short-term use only | $5–$15 |
| Straw Mulch | 5°F to 15°F (-15°C to -9°C) | Perennials, bulbs, roses | Long-term insulation, improves soil | Heavy, can attract pests | $10–$25 (per bale) |
| Burlap Sacks | 10°F to 20°F (-12°C to -6°C) | Trees, large shrubs | Breathable, wind-resistant | Limited sunlight penetration | $8–$20 |
| Insulation Board (Rigid Foam) | Below 0°F (-18°C) | Potted citrus, tropical plants | High insulation, long-lasting | Expensive, not reusable | $30–$80 |
For annual vegetables like tomatoes or peppers, a frost blanket or row cover is ideal during early spring or late fall freezes. These materials allow 60–70% sunlight to pass through while trapping enough heat to raise temperatures by 5–10°F.
In contrast, perennials and shrubs benefit more from straw mulch or burlap sacks, which provide deep, long-term insulation against prolonged cold snaps.
If you're in USDA Zone 5 or colder, consider combining materials for layered protection. For example, wrap a potted plant in bubble wrap, then place it inside a row cover secured with stakes.
This dual-layer approach can protect against temperatures as low as -10°F (-23°C). Always monitor your plants for signs of moisture buildup or mold, especially under non-breathable covers like plastic.
One common mistake is using plastic sheeting directly on plants, which can cause root rot from trapped moisture. Instead, opt for breathable fabrics like frost cloth or burlap.
For tropical plants or citrus trees, rigid insulation boards or even Christmas lights (for warmth) can be a game-changer in extreme climates.
For bulbs
How to properly install winter protection for maximum plant safety
Winterizing your garden isn't just about throwing covers over plants—it's about creating a microclimate that shields roots, stems, and foliage from freeze-thaw cycles and windburn. I’ve learned the hard way that improper installation can trap moisture, suffocate plants, or even invite pests.
The key is balancing insulation, ventilation, and stability to keep your garden thriving until spring.
Start by identifying your vulnerable plants—tender perennials, young shrubs, and evergreens with thin foliage need extra care. For example, roses and hydrangeas benefit from mulch rings, while citrus trees in pots require insulated wraps and bubble wrap sleeves.
The goal is to mimic the natural snow insulation Mother Nature provides without smothering your plants.
- 1 Clear debris and prune – Remove dead leaves, weeds, and diseased stems to prevent moisture buildup and pest hiding spots. Trim back overgrown branches to reduce wind resistance.
- 2 Apply mulch (4–6 inches) – Use straw, leaves, or shredded bark around the base of plants (avoid touching stems). This creates a thermal blanket for roots and suppresses weeds.
- 3 Install windbreaks – Use burlap screens, plastic lattice, or evergreen shrubs to block cold winds. Position them on the north or northwest side of vulnerable plants.
- 4 Secure frost blankets – Drape frost cloth or row covers loosely over plants, using bricks, clips, or PVC hoops for support. Leave sides open for airflow to prevent condensation damage.
- 5 Add insulation for pots – Wrap potted plants in bubble wrap or insulated sleeves, then nest them in straw or leaves. Move containers to a sheltered spot against a south-facing wall.
- 6 Monitor and adjust – Check covers weekly for moisture buildup or pest activity. Remove covers on mild days to prevent rot and allow air circulation.
For DIY windbreaks, repurpose old fencing, pallets, or even snow fences to create a barrier. I once used brick columns wrapped in burlap to shield my tomato plants during late-season frosts—it worked like a charm!
Just ensure the structure is sturdy enough to withstand winter storms. If you’re in a Zone 5 or colder, consider adding a second layer of protection like a clear plastic tunnel for extreme cold snaps.
One of my biggest mistakes was over-tightening covers, which trapped moisture and led to fungal growth on my hostas. Always leave gaps for airflow and avoid plastic directly on foliage, as it can cause sunscald when temperatures rise.
Instead, opt for breathable materials like frost cloth or burlap, which allow moisture to escape while retaining heat.
Finally, don’t forget to label your protected plants with plant tags or twine markers so you can identify them come spring. I use waterproof labels tied to stakes—it’s a small step that saves hours of guesswork later.
With these steps, your garden will be ready to rebound as soon as the last frost passes.